Advanced Webpack
Assets, Dev-servers, Debugging and more.

Life is becoming more interesting every day...
Currently, I am invested in being a better backend engineer, and also a medical doctor in training.
I have a keen interest in cloud engineering, biotechnology and molecular biology, and a fascination with VR.
In my free time, I enjoy reading, playing strategy games, experiencing music, and exploring philosophy.
Introduction
In the last edition of the Modern Web dev series, we looked at how to get started using Webpack, and implement its basic functionalities like bundling modules and configuring how code is run.
In this week's edition, we will look at how to do some extra stuff developers use in their day-to-day jobs like loading CSS, images, and fonts. Also, we will see how to set up a local host developer server offered by bundlers, manage outputs, generate HTML, and more. It will be fun.
Pre-requisites
A little knowledge of the DOM
HTML and CSS
import and export statements of Es6 modules
How to organize files
Loaders
Webpack can bundle different things, not just HTML as we did in the previous post, Webpack can also bundle CSS files, JSON, fonts, and Images in png, jpg, and SVG formats too.
Webpack uses tools called Loaders to handle these assets differently. Loaders are tools that help bundle assets that are not Javascript. Since these assets are in different formats, the Loaders are also specific to the assets they help to bundle.
Make your project npm and Webpack worthy Download npm and Webpack in your project. Also, import Lodash. We would be bundling CSS, Fonts, and Images, so do well to add them to your .src folder.
Let's use the setup from the previous post with a few changes. Organize your file and folders this way:
webpack-demo
  |- package.json
  |- package-lock.json
  |- webpack.config.js
  |- /dist
    |- bundle.js
    |- index.html
  |- /src
    |- my-font.woff
    |- my-font.woff2
    |- icon.png
    |- style.css
    |- index.js
  |- /node_modules
Loading CSS
Step 1: Install CSS Loaders
npm install --save-dev style-loader css-loader
Step 2: Update your webpack.config.js file to look like this:
const path = require("path");
module.exports = {
  entry: "./src/index.js",
  output: {
    filename: "bundle.js",
    path: path.resolve(__dirname, "dist"),
  },
  module: {
    rules: [
      {
        test: /\.css$/i,
        use: ["style-loader", "css-loader"],
      },
    ],
  },
};
This POC(Piece Of Code) means that the loader we are using is a module and the way it works is to go through all files, and if it ends with the .css format, use the loaders we just installed.
Step 3: Let's test it out. Add some CSS in ./src/css, and change the ./src/index.js file to use the CSS.
.src/css
.hello {
  color: red;
}
./src/index.js
import _ from "lodash";
import "./style.css";

function component() {
  const element = document.createElement("div");

  // Lodash, now imported by this script
  element.innerHTML = _.join(["Hello", "webpack"], " ");
  element.classList.add("hello");

  return element;
}

document.body.appendChild(component());
Step 4: Run your build command in the terminal npx webpack
- Check your HTML output and you'll see that it is styled. This effect would not be possible without CSS loaders.
Loading Images
You don't need to install image loaders, because it is a native ability of Webpack.
Step 1: Add these LOC(Lines Of Code) directly below the loader for CSS in webpack.config.js
 {
   test: /\.(png|svg|jpg|jpeg|gif)$/i,
   type: "asset/resource",
  },
Step 2: You should add a picture to your ./src folder if you have not already
Step 3: Import the picture into your ./src/index.js file
import _ from "lodash";
import "./style.css";
import Icon from "./icon.png";

function component() {
  const element = document.createElement("div");

  // Lodash, now imported by this script
  element.innerHTML = _.join(["Hello", "webpack"], " ");
  element.classList.add("hello");

  // Add the image to our existing div.
  const myIcon = new Image();
  myIcon.src = Icon;

  element.appendChild(myIcon);

  return element;
}

document.body.appendChild(component());
Step 4: Tweak the photo with some CSS in ./src/style.css
.hello {
  color: red;
  background: url('./icon.png'); /* Add  this line*/
}
Step 5: Run your build command npx webpack
- Open up the webpage in your browser and you should have a photo styled with some CSS
Loading Fonts
Step 1: Now let's load fonts. Yes, you guessed correctly, we will update webpack.config.json and add this POC below the loader for images.
{
  test: /\.(woff|woff2|eot|ttf|otf)$/i,
  type: 'asset/resource',
 },
Step 2: Add some font files to your .src folder if you haven't already.
Step 3: Update your CSS to use the fonts
@font-face {
  font-family: 'MyFont';
  src: url('./my-font.woff2') format('woff2'),
    url('./my-font.woff') format('woff');
  font-weight: 600;
  font-style: normal;
}

.hello {
  color: red;
  font-family: 'MyFont';
  background: url('./icon.png');
}
Step 4: Run your build command npx webpack
- As usual, the fonts have taken effect on our webpage
Output Management
Since we manage assets differently, it is also possible to specify different output points for different assets and files.
Step 1: Let's add another Javascript file to test this out, rearrange your file structure
webpack-demo
  |- package.json
  |- package-lock.json
  |- webpack.config.js
  |- /dist
  |- /src
    |- index.js
    |- print.js // add this
  |- /node_modules
Step 2: Add some code to ./src/print.js file
export default function printMe() {
  console.log("I get called from print.js!");
}
Step 3: Let's import the function in our .src/index.js file
import _ from "lodash";
import printMe from "./print.js";

function component() {
  const element = document.createElement("div");
  const btn = document.createElement("button");

  element.innerHTML = _.join(["Hello", "webpack"], " ");

  btn.innerHTML = "Click me and check the console!";
  btn.onclick = printMe;

  element.appendChild(btn);

  return element;
}

document.body.appendChild(component());
Step 4: Replace the script tag in the HTML
<script src="index.bundle.js"></script>
Step 5: Update your webpack.config.js file
const path = require("path");

module.exports = {
  mode: "development",
  entry: {
    index: "./src/index.js",
    print: "./src/print.js",
  },
  output: { // Add this section
    filename: "[name].bundle.js",
    path: path.resolve(__dirname, "dist"),
  },

  devServer: {
    static: {
      directory: path.join(__dirname, "dist"),
    },
    port: 3000,
    open: true,
  },
};
output: { filename: '[name].bundle.js',configures Webpack to generate an output file with the specified entry names.Observe that if there are two files, and the output should work perfectly. There are two outputs
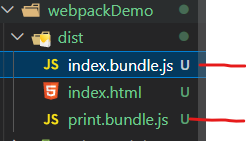
Updating HTML files
If we change the names of the entry, Webpack will generate a new file but still link to the older file's name.
So if we wanted to automatically update the HTML every time we changed the entry and output, what would we do? Luckily the creators of Webpack had this in mind.
Step 1: Install the HTML updating the plugin from npm
npm install --save-dev html-webpack-plugin
Step 2: Update the webpack.config.js file to make changes
const path = require("path");
const HtmlWebpackPlugin = require("html-webpack-plugin");

module.exports = {
  entry: {
    index: "./src/index.js",
    print: "./src/print.js",
  },
  plugins: [
    new HtmlWebpackPlugin({
      title: "Output Management",
    }),
  ],
  output: {
    filename: "[name].bundle.js",
    path: path.resolve(__dirname, "dist"),
  },
};
Step 3: Now let's run our build command npx webpack
- Webpack will build its own HTML file automatically depending on the entry and output points.
Cleaning up /dist
In order to unclutter our ./dist folder, let's make Webpack able to delete files it's no longer using.
To do this, add this to the output section of your webpack.config.js file: clean: true,
Setting Up a Developer Environment
Whenever we run our build command, we always need to run a build command, either npx webpack or npm run build. This is redundant and luckily for us, Webpack gives us a feature to create a local server when working locally.
Hence, whenever we make changes, Webpack will automatically bundle without us needing to run a build command every time.
Step 1: First install the Webpack dev server. Yes, it is a package. Run this command in your terminal.
npm install --save-dev webpack-dev-server
Step 2: Then go into the webpack.config.js file and configure the dev server option. Update it
const path = require("path");
module.exports = {
  entry: "./src/index.js",
  output: {
    filename: "bundle.js",
    path: path.resolve(__dirname, "dist"),
  },
  module: {
    rules: [
      {
        test: /\.css$/i,
        use: ["style-loader", "css-loader"],
      },
    ],
  },
  devServer: { // Add this section
    static: {
      directory: path.join(__dirname, "dist"),
    },
    port: 3000,
    open: true,
  },
};
port:3000tells Webpack the port to open on the local host(your local computer),open:trueand tells Webpack to automatically open a webpage anytime the server is sprung up.
Step 3: Create another npm script "dev":"Webpack serve" to set up the server in package.json .
"scripts": {
  "test": "echo \"Error: no test specified\" && exit 1",
  "build": "webpack",
  "dev": "webpack serve"
 },
Step 4: Run the script npm run dev in your terminal. This will spring up a server local host 3000 and automatically serve your files there without you having to run those build commands manually.
Debugging with Source Maps
What helps us debug problems? A debugger. What about a tool that comes without a debugger? A bugger! Okay, Terrible joke. Webpack comes with a feature to help us track which of our files are causing errors in our bundling process.
These features are called source maps. Source maps can map the bundled code and trace it back to the original source code. So if any error comes from any of the different files, Webpack can easily identify it.
Note that this is meant for development only.
Step 1: Change the mode to development in webpack.config.js
Step 2: Update your webpack.config.js file
const path = require("path");
const HtmlWebpackPlugin = require("html-webpack-plugin");

module.exports = {
  mode: "development",
  entry: {
    index: "./src/index.js",
    print: "./src/print.js",
  },
  devtool: "inline-source-map", // add this line
  plugins: [
    new HtmlWebpackPlugin({
      title: "Development",
    }),
  ],
  output: {
    filename: "[name].bundle.js",
    path: path.resolve(__dirname, "dist"),
    clean: true,
  },
};
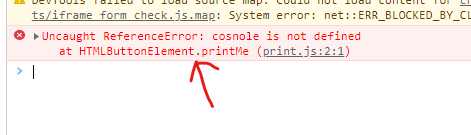
Step 3: Let's create an error in one of the files ./src/print.js
cosnole.log('I get called from print.js!'); // cosnole instead of console
Step 4: Run your build command npm run dev in your terminal
- Check the error message, you click the button and you will see that it tells us the exact file where the error is coming from.
Conclusion
Phewww ! This has been one hell of a piece. If you went through it in one go, then high five.
We've learned a lot in this article like debugging with source maps,output management, generating HTML, setting a local server, loading assets, and built on knowledge from previous Webpack articles in the Modern Web Dev series. If you didn't understand something, please go through the previous article and hit me up.
In the next article, we will take our journey to a different town. Bye, for now. Love you 🤗💗.


